The electronic age can make editing much quicker and simpler than in the past. While it is still BETTER to print files for edits at least once (if you are doing a print version of the book, actually READ your print proof as a final read-through before making it available to readers in print or ebook if you have the time), deadlines, shipping fees for printed manuscripts, and printer cartridges do not always allow for that. Sometimes I work with authors who haven’t done a lot of work in Microsoft Word in order to be used to the editing features available to them. This tutorial will run through some basics and give some helpful tips where possible in order to help make the most out of the most frequently used editing program. (some features may be exclusive to this version and/or Windows. I pay $6.99 a month for a subscription, so it updates to the newest versions on its own and I don’t have to keep replacing it when the old one becomes obsolete. It’s worth it and the subscription is a tax write off for authors and editors.)
Software: Microsoft Word via Microsoft Office 365, used on Windows 10 with a PC.
First thing you will want to do is update your SHORTCUTS. You don’t understand how important these are and how much time you save not having to click through the regular navigation chasing them down. They give you a few generic ones at the top but this is how mine looks (and I use them all frequently):

From left to right: Undo, Create New Document, Open a Different Document, Save, Save As, Print Preview/Print, Find, Replace, Accept, Reject, Thesaurus, Redo
The 4 you should have in your shortcut for editing are: FIND, REPLACE, ACCEPT, and REJECT. More on those later. Everything else is pretty common and self explanatory, but these 4 will save you a headache later (when used properly and NOT used blindly). All 4 can be found in your regular navigation menus, but you won’t have to go shifting for them. I think they added ADD A COMMENT as a shortcut, but I have not tried to add it to this computer as of yet.
To add shortcuts to your navigation ribbon, click on that eject-looking thing at the end to get this menu:

When you click on MORE COMMANDS, you will get the following screen. You may have to change POPULAR COMMANDS to ALL COMMANDS if you aren’t seeing what you want. Select it on the left menu and it will shade it blue, then click the ADD in the middle. If you accidentally put something in you don’t want (or end up not ever using it) the REMOVE will take it out if you click on it in the right menu. The up and down arrows on the far right will let you rearrange which icons go where on your ribbon. (I circled the 4 I mentioned above that will be beneficial).

*****
Now that we have our shortcuts, Let’s take a look at the other menus. From left to right you have: File, Home, Insert, Design, Layout, References, Mailings, Review, and View. I am only going to discuss a few features found in FILE, LAYOUT, and REVIEW since this is on the editing bit and not writing or formatting.
If you click File, you will get this screen:

In OPTIONS, you can change your auto-correct settings, what spelling and grammar check will mark, and some formatting preferences you or your publisher may have. Most of these are already made for you. If you go click on PROOFING, you can make additional changes. Like if it automatically changes certain words they way your phone would do, you can turn it off in here. If you prefer straight quotes to curly/smart quotes (the standard ones) you can turn them into straight quotes here.
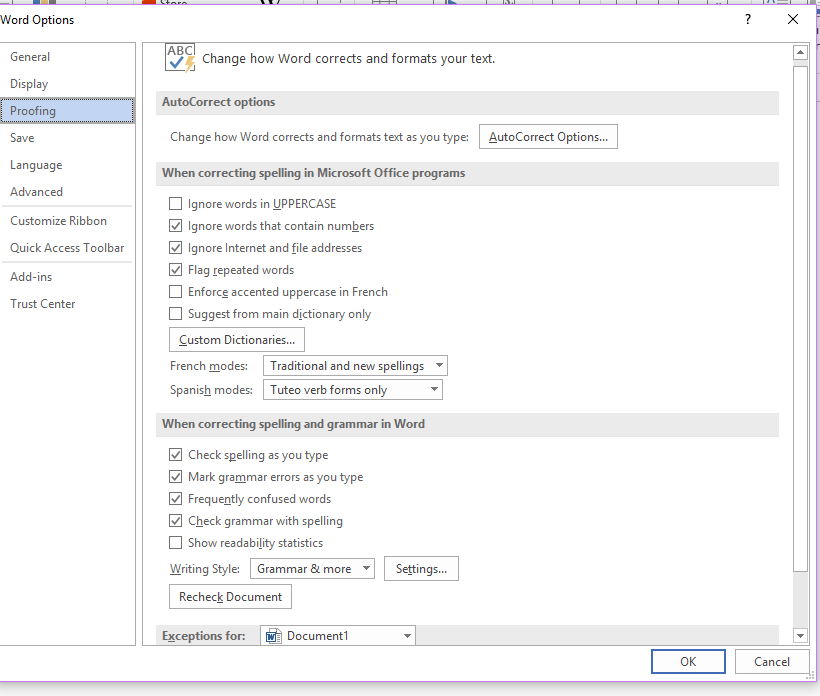
Hint: Do not turn off your spell check and grammar check. Even though Word is notorious for marking incorrect grammar issues, it has gotten a little better and it’s now helping to weed out redundant wording. While you can’t depend on Word to find all your typos, it will find a good deal of them. It never hurts to run a spell check before sending to an editor as well, just in case.
Hint 2: If you have made up words or names that show up as misspelled, right click on the word and add it to your dictionary. This way, if YOU misspell your own word/names, only the incorrect ones will show up as misspelled. You will need to make sure to add them as singular, plural, and possessive (and if there is any other tense for a verb).
The LAYOUT menu looks like this:

It works best to do this BEFORE sending to edits, but you can use this to control your indents, line, and paragraph styles. Editing is easier on the eye if it is DOUBLE SPACED. It increases page count, true, but it’s easier to spot things with less pushed up together. Also, for formatting reasons auto-indenting paragraphs makes using the tab key unnecessary. Sometimes tabs can mess up ebook/print formatting, so this will be in your best interest to acquaint yourself with. 😉
It automatically sets 8pt spacing between paragraphs by default. Set that to zero right there on the navigation bar and click the drop-down box right under that in the corner to the right of “paragraph” to set indents and spacing. You’ll get this screen. I’ve pre-set mine to the preferred settings for most online publishers (they will tell you if they want theirs different in anyway. Some people like 1″ margins; mine are set to zero).

REVIEW is where the action’s at. You can add/delete comments, search through them, and do a ton of work with track changes. The menu looks like this:
![]()
This is your mainframe for comments and track changes, it also has another way to access the thesaurus and spellchecker. I will get more into specifics of track changes shortly, and comments themselves. (note that there is also a comment option in the INSERT navigation box, you can add it to your shortcut ribbon, and when you highlight something and right click you can find an add a comment option there as well.)
*****
TRACK CHANGES will be your biggest friend and worst enemy at the same time. For all the help it does, it creates a lot of problems if you do not take your time and do things efficiently. You can easily hit reject instead of accept or vice versa, or hitting “accept and move to the next” without reading back over the change can result in missing/extra words/punctuation.
That said, the first thing an editor will do is turn this feature on. It will still be on when it goes back to the author unless they turn it off. (do not turn it off unless the editor asks you to do it. Me? I want to see EVERY change made because I want to make sure I don’t miss silly revision mistakes. I read it before I accept the change. And 3 more times after I accepted the change. Half the time it is fine. Sometimes there is an error made by the author, sometimes there is an error made from the revision itself. Track changes for *me* helps me remember to slow down and not read too quickly on additional rounds. I know I am not missing any content, and can see what was changed and rejected (if the author tells me it was rejected–more on that in a bit).
Turning it on and off is easy. Click Track changes and it gives you the option to select it (same thing turns it on and off–it is blue when it is on. White when it is off) or to lock tracking so anyone else using the document can’t turn it off until revision is over. (I haven’t used this…yet. But the option is there… If you think I am threatening some of my authors that I might use this on them….I am, and they know who they are. lol)

Then you can select to show or hide how much mark up you see on the screen. “Show Markup” lets you select what shows up in track changes. Reviewing pane is where the comments and formatting notes will appear (they show to the side by default). Here is a sample of a document with tracking and comments on”All Markup:”
 Now here is the same thing in “Simple Markup.” Notice that you can see what lines has changes by the markings on the left, but the text is clean, showing how it would look if changes were accepted as is, comments hidden as well:

There are two more options not pictured: No Markup and Original.
 No Markup does the SAME as Simple Markup but doesn’t have any signifying marks. Original will show what it looked like before YOU made changes. Meaning, if you receive edits back from me, it will revert back to my changes in that option. It’s the original version of THAT file.
If you cannot work with Track Changes showing and your editor wants changes shown (without having to lock them like a big meanie! lol), I would suggest going back and to between “All Markup” and “Simple Markup” to check the editor’s changes with it showing, and then to make changes yourself with it hidden. However, these options may not be in older versions of the program. And in that case, I don’t know what to tell you except it’s time to update your software.
ACCEPTING AND REJECTING
There are three ways to do this and each have their own positive and negatives. Above all, take your time. Read over changes made by the editor very carefully. You may not agree with a change and have the impulse to reject it right away. Consider this: why was this made? If the editor misunderstood something and made an incorrect change or assumption, why do you think that is–could it have had to do with clarity? Editors are not out to be the bad guys, remember that. Secondly, if they marked something to be cut, make sure nothing is left behind or cut with it on mistake. Read over it before accepting/rejecting, read over it after, and read over it again after you make any additional change to it. If rejecting, leave a comment on it and say why it is being rejected. This ensures it’s not repeatedly marked every time the editor sees it and that if there is some issue that needs to be addressed with it, it can be addressed. I have seen authors reject fixes for silly things like improper semi-colons or continuity issues without leaving a comment or asking why it was marked if they didn’t understand. And, likewise, I have marked things that seemed off to me as a reader that didn’t really have an issue. It’s better to be safe than sorry and I would rather see a change rejected and addressed than a real issue sneaking back in.
That went on a tangent, but it’s accurate so I am leaving it. lol Back to our regular scheduled programming…
Most Common Method of accepting/rejecting: Using your mouse/right click.
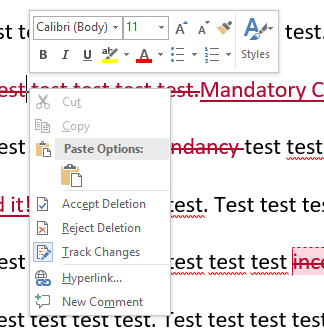 The Positives: This is the most EFFECTIVE way to ensure you read changes carefully and don’t hit the wrong one by mistake because it takes the most time. It will accept/reject ONE change at a time in one place.
The Negative: If you are prone to carpel tunnel, this could cause a flare up. I have had to put on a wrist brace many times when I have a lot of edits back to back. Each change calls for a right click and then a left click on the mouse when utilizing this method.
The Quick Method: Using the Shortcut buttons.
![]() Remember this? This is a big time saver, but also prone for mistakes so use wisely. This option accepts/rejects and then immediately MOVES TO THE NEXT CHANGE. So if the next change is 50 pages away, you will end up 50 pages away as soon as you click it! It’s dangerous, man!
Remember this? This is a big time saver, but also prone for mistakes so use wisely. This option accepts/rejects and then immediately MOVES TO THE NEXT CHANGE. So if the next change is 50 pages away, you will end up 50 pages away as soon as you click it! It’s dangerous, man!
The Positives: Only one click instead of two so it is easier on the wrist and you’re not having to highlight or place the cursor on the word to accept/reject.
The Negative: More likely to make mistakes from rushing. Because it jumps from one change to the other, the person using these may not be reading the content in between or double checking for editing errors in what they already accepted/rejected. This option may skip over highlights/formatting corrections and cause you to backtrack. Includes comments as changes.
Now it does have it’s merits if there is a LOT of changes on a single page, I alternate between this and the mouse, but if you can’t see the next change it’s going to jump over a large portion of content. Use wisely and do not rush edits or forget to read back over changes after the change is added in–that is how editing mistakes get into the final version.
The Finale method is in the Review navigation with the buttons next to the track changes functions.
 Least used: This streamlines both the shortcut key and the mouse functions into one. If you click on the top half of the accept or reject over the check or the X, it will accept the way the mouse does in one click, one at a time, whatever the cursor is on. If you click the drop-down, you can get fancier with it by accepting ALL changes in the document/Rejecting them all, or doing either\or and turning tracking off in one go. The Previous/Next does what the shortcut keys do, only it gives you the option to go backward as well as forward if you missed something.
The Positives: Less clicking with the mouse. Next and Previous do not accept/reject. Only takes you to the changes and highlights them so you can click the accept or reject. These tools are great for when you are done with the final round of edits and are making sure you have found all the changes (some, like spacing issues, are invisible in the markup at times) before turning tracking off.
The Negatives: Gives too many ways to rush through edits and not do a good job. Remember, editors are NOT infallible. Even the best editors make mistakes, so don’t accept all at once and believe editor magic has no flaws! 😉
*****
COMMENTING
Can be found with right clicking your mouse, can be added to your shortcuts ribbon, and is in the Insert and Review tabs. For the sake of this tutorial I am using the ones in the Review tab.
To create a comment, all you have to do is either place your cursor on an area it is referring to, OR left click and highlight a section with your mouse and release (so there is a gray shading over the word/phrase) then click “Add a Comment” and a comment box will pop up right there to the side. Super easy!
 This version of word added additional features that are not in older versions of the program. You can now respond directly to the comment by hitting REPLY, or if you need to mark what comments/notes you took care of/acknowledged in your end of edits, you can hit resolve and it will shade in like this:
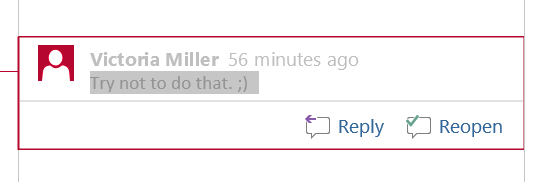 If you work on certain things out of order (some people do) they can keep track of what’s completed and what’s not.
*****
A few more things to cover that may be useful. Editors like to give you things to fix that are harder to do as you’re editing the text itself. Say you use a word too many times but you’re so focused that it’s not popping out at you. I’ve come to learn that some authors will track those words down and hunt them to extinction and others won’t bother. It’s hard to say if they just forgot or if they didn’t think it important, but I find hunting trouble words before and/or between rounds of edits works the best.
FIND and REPLACE (aka gift from the gods)
Say you need to change a character’s name, or you used Just 239 times in 200 pages. Never fear! it can be an easy fix without scouring page by page seeking them out blindly. (again, not infallible. If the word is part of another word or has more than one meaning and you don’t read over the content after, it can cause problems)
FIND tool looks like this:
 Because this document was basically one word (lol) there are too many results to list them out, but if it was a small amount it would show you captions using them right below the text on the left. You can also find chapter headings and pages quickly in this tool. If there aren’t many options, it’s easy to go in one by one and make sure you’re change is correct without replacing them blindly.
If you need to be more specific, say a name you used is also a common noun, so you want to change the name and not the common noun. You can click that drop down menu and then go to Options and narrow down the search (or if you are looking for just and don’t want justice and adjust to be included, you can pick “Find whole words only”)
 Advanced Find will take you to the find and replace feature, or you can bypass it and go straight to the replace button to get this to change one thing to another in the entire document:
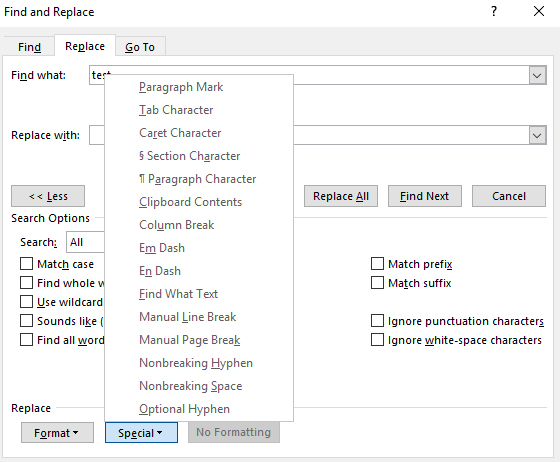
 Or, say you need to change all your double hyphens to a true em dash, you can click that more and then special characters and find it.
Note: Find/Replace can also be located in the Home Navigation bar on the far right.
COMPARE DOCS/COMBINE DOCS
This is a last case scenario that I only use when I receive edits back with no track changes remaining. It takes a LONG time to get through because it’s a jumbled, hot mess. you can also use this if you need to check behind an editor you are suspicious of to see if they are making changes that are not documented for some reason. (or a publisher or a co-writer, etc.) And you SHOULDN’T need to use this very often, if at all.
This feature is located in REVIEW

(the show source documents option is unavailable for this sample document because there’s not a lot of changes, so no matter which option I pick, it will combine it into one document only. When there are massive amounts of changes It will show a triple screen. The combine doc on the left and then two small screens to the right, the original doc and the second doc so you can see which source produced what changes.) I am using Combine Documents for the example.
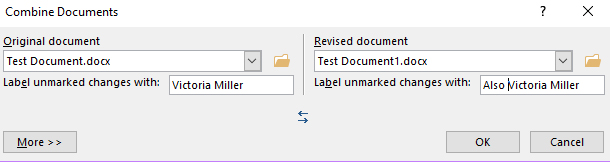 You pick the 2 files to compare. If I needed to do it, the first option would be the edits I last sent to the author as the first and the second would be what came back to me.
 It will give you a pop up for either one (the other may differ slightly). In this instance, the one not marked is the one you’d want. You always want the most up to date file to get the marks/format. You’re only using this feature to make unmarked changes between the 2 show as changes.
 The last set of edits was the red, and the purple are all the hidden changes between the 2 (or the changes that were accepted in from a previous round that were not in the second set at all….). If you are staring at this wanting to stab your eyes with a fork because it looks confusing as hell. It is. Even if it gives you the triple screen. Don’t make your editor edit this way. I speak for all of us. LOL
Use Track Changes. If you need to shift from all markup to simple markup/no markup, do that, but do not remove it or turn it off until editing is complete. It may seem cluttered, but there are ways to get around it that work for everyone. Above all, whatever it takes to make sure your book gets the best editing it can get is what is important. ❤
